1.The first you need download new version from codecanyon 2.extract QUICKAD-CMS-8.2.Zip (version number is random) 3.and now you can update site from admin panel 4.You can update your site automatically from Admin panel > Update and upload new version zip.
Before install, Your server must match following requirements to run the script properly
PHP 5.6.0+
OpenSSL PHP Extension
Mbstring PHP Extension
PHP Fileinfo extension
PHP Zip Archive
PDO PHP Extension
XML PHP Extension
JSON PHP Extension
Rewrite Module (Apache or Nginx)
Please consider that some other php setting values might be required.
PHP.INI Requirements
open_basedir must be disabled
File and folder permissions
/includes/config.php 775
Create a new database on your mysql server, after unzpip the file you downloaded from CodeCanyon and upload the contents of QUICKAD-CMS-VER folder to your server root, usually /path/to/www/ or /path/to/html/ or /path/to/public_html/.
Important: Make sure that .htaccess file got copied properly from the download to main QuickadClassified folder on your server.
Create a new database on your mysql server, after unzip the file you downloaded from CodeCanyon and upload the contents of QUICKLANCER-CMS-VERSION folder to your server root, usually /path/to/www/ or /path/to/html/ or /path/to/public_html/.
Important: Make sure that .htaccess file got copied properly from the download to main Quickalancer folder on your server.
Step 2: Accept license agreement of policy and click next.
Step 3: Create a database with phpmyadmin.
Step 4: Enter all details in form and click install
Step 5: Installation done
All is done Installation completed. click on frontend and enjoy with Quicklancer
Don't forget to delete the install directory.
6. How employer can pay to freelancer on Quicklancer php script
Employer can pay via milestone payment.
Step 1 : Post project
Step 2 : Accept bid of any freelancer
Step 3 : Create milestone payment
Step 4 : Release milestone payment when freelancer work done, and (Freelancer can set milestone status to mark as complete) so employer saw that and check the work on satisfaction release the fund.
Then freelancer got amount in his/her wallet
Regards
7. Troubleshooting SMTP Issues
Basic Configuration for SMTP Server
Problem
Description: User was unable to configure the SMTP e-mail server.
Solution
Check the SMTP server settings.
SMTP server address—Check the host name or network address of the SMTP e-mail server. Typical SMTP server addresses or host names are as follows:
smtp.bylancer.com
smtp.gmail.com
smtp.mail.yahoo.com
AWS
TLS—Check whether Transport Layer Security (TLS) option is enabled. This setting ensures that the information is transmitted over an encrypted channel. Not all SMTP servers support encryption. If TLS option is enabled for an SMTP server that does not support TLS, then disable the TLS option.
Port—Check with your e-mail service provider for the port number that the SMTP server listens to. Generally, port number 587 is used for a TLS connection and port number 25 is used for unencrypted connections.
Typical SMTP server settings are as follows:
smtp.bylancer.com—Set TLS to No and port number to 25
smtp.gmail.com—Set TLS to Yes and port number to 587
smtp.mail.yahoo.com—Set TLS to Yes and port number to 465 or 587
Check the SMTP authentication settings.
Check whether the e-mail server requires authentication. If yes, then specify the following options.
From Name
User Name
Password
From E-mail Address
NOTE :
If Gmail blocks SMTP e-mails, then log in to Gmail account, navigate to Advanced Settings > Security > Less secure app access and click the toggle button to turn on Allow less secure apps option.
Test SMTP settings by sending a test e-mail.If you are unable to send a test e-mail:
Check the SMTP server settings to see if they match the SMTP server provider’s settings.
Check authentication credentials.
Check the SMTP server provider’s security settings for SMTP (for example: Gmail blocks SMTP email unless user selects less secure app settings on their gmail account).
Check whether there is network access from CSO to the SMTP server.
Check whether the firewall is blocking SMTP traffic to SMTP server or whether the ports are blocked. If the server settings and authentication settings are correct, check whether the firewall is blocking port 587 and 465 and SMTP traffic. If it is a case of the firewall blocking, then work with the network administrator to unblock ports 465, 587, and SMTP traffic.
8. Facebook login configuration
To enable Facebook Login you just need Facebook App ID and App Secret.
Edit your php.ini, find allow_url_fopen and set it to allow_url_fopen = 1
Or if you don't understand how to do this then contact to your hosting support team and enable the allow_url_fopen in your PHP configuration
Thanks
10. How to enable takeaway & how it work ?
What is the takeaway?
a restaurant where food is ordered and made and is then taken away to be eaten at home or elsewhere.
How to enable it (for restaurants)?
To enable takeaway: In Login in Frontend > Go to Dashboard > Manage restaurant now scroll down there you found an option to enable or disable takeaway order. Enable it and enjoy.
How to use it (for user/customer)?
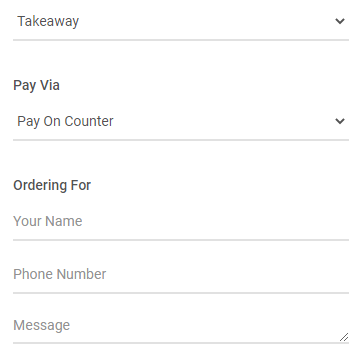
First, make your order then view the order. You can see your selected order, you can increase the limit here. Also, you can choose your ordering type (On table/ Takeaway/ Delivery).
After selecting the takeaway or delivery option some extra form field will open for customer details and shipping address. you have to fill it and make your order complete.
11. Manage languages (Add Edit Delete)
We have multi language management tool in our admin panel here you can add your choice of language and manage it, you can enable disable any time. QuickCMS is support all language.
For add any language you need to go to Admin panel > Languages click on that
Page will open here screenshot added
How to add new language?
You can see Add Language button top right corner. click on that for add any new language.
A sidepanel will open in this form you need to write all details related to your language which you adding
Language name - Write here your language name in text
Language Code (ISO 639-1) - Write here your language code ex: en,
Direction - Select language direction LTR or RTL
Active - This is for enable/disable the language
Screenshot :
How to Edit new language?
Here a screenshot provide with written details and steps. Just simple click on edit button and edit details later save it.
If you want to change any text which show in frontend, you think this is not correct translation and thinking about to change/edit the content then this is the place where you can edit each text of frontend theme. for any languages.
Here is instruction how to edit the text.
This is the english language choose by user then
Go to in-front of english language and click on Edit english file text button
When you click on this button a new page will open with all text list.
If you want to change text for Arabic or any other language then follow same process.
You need to go back and click on Edit Arabic language file .
Easy & fast process for edit any language keywords.
Hope you like this article.
13. How can I create new themes?
Make a copy of /templates/{Themes-folder} folder, rename it, open /YOUR_THEME/theme-info.txt and change the details info there.
Once you have changed the info, save the file, go to you admin panel -> Change themes -> and you’ll find your theme there, under your theme name, click on activate me.
14. Manage Categories
All demo category are pre inserted on theme activation.
If you want to change it here is a category management tool.
We integrate a category management app in which you can easily create, drag-drop, edit, delete language translate on one page.
Go to Admin panel > Category
As you can see in following screenshot.
15. Gmail SMTP setup
Solution
Check SMTP settings, enable less secure apps, and unlock Captcha:
Turn ON the "Less Secure App" access or click here.
If 2-step-verification is enabled, then you will have to create app password for your application or device.
For security measures, Google may require you to complete this additional step while signing-in. Click here to allow access to your Google account using the new device/app.
Note: It may take an hour or more to reflect any security changes
<Directory /var/www/>    Options Indexes FollowSymLinks    AllowOverride All    Require all granted
</Directory>
3. You have to enable the rewrite module. In your terminal write:
sudo a2enmod rewrite
Then RESTART apache2 for the changes to commit. The site will then show the internal pages.
sudo service apache2 restart
17. Update to Bookme 4.0
If you are using the Bookme 3.0 or older and want to install the Bookme 4.0, then read below; otherwise, you can install the plugin usually.
Important: we recommend you to backup your website before making any update. Read more about WordPress backups here. And if you only want to backup your bookings then you can use the export feature on the booking page and save a backup on your computer.
We developed Bookme 4.0 with a new architecture, so you need to follow the below steps for updating the plugin with the old Bookme data.
Go to your WordPress admin > Plugins and deactivate the old Bookme plugin and delete the Bookme plugin folder from your site.
Now upload the new plugin file and install the plugin.
With this process, your old Bookme data will be used in Bookme 4.0.
Important: Even though we test our code completely before any update, we cannot guarantee that there won’t occur any issues in your installation due to the work of other plugins.
18. How to create a custom theme for QuickBioLink?
You can create your custom theme with our CMS.
There are mainly two folders.
1. public/templates/{theme-name}: Static assets are usually stored in the public folder in Laravel. You can create a new folder with your theme name to store all the theme assets (CSS, JS, and images). For the preview image of your theme, you need to add a preview.jpg file here.
2. resources/views/templates/{theme-name}: Views contain the HTML served by all the theme pages. All the view files will be stored here. You can create a new folder with your theme name to store the view files here. For a quick start, just copy the default (classic) theme, paste it, and rename the folder name with your theme name. And now edit all the files inside this folder to change your theme.
Folder Structure:
Note: Do not rename any file or edit the folder structure. Because these files are connected with the routes.
Go to admin > templates and here you can see your created custom theme.
For any other help create a support ticket.
19. How to get Google Map API?
Login to Google console
Create new project, and enable those APIs: Google Javascript Map API, Google Embed API
Setting up a wildcard subdomain in QUICKCMS allows your website to respond to any subdomain (e.g., slug.yourdomain.com) without needing individual configurations for each. This is particularly useful for dynamic product URLs in a SaaS environment. Follow these steps to configure wildcard subdomains in QUICKCMS:
1. Configure DNS Settings:
First, you'll need to create a wildcard DNS record to direct all subdomains to your server's IP address.
Access Your DNS Management Panel: Log in to your domain registrar's control panel or wherever your DNS is managed.
Add a Wildcard DNS Record: Create a new DNS record with the following details:
Type: A (Address) Record
Host or Value: *.yourdomain.com.
Points to: [Your Server's IP Address]
This setup ensures that any subdomain (e.g., product1.yourdomain.com, product2.yourdomain.com) points to your server.
2. Configure Your Web Server:
Next, set up your web server to handle requests for these wildcard subdomains. The configuration steps depend on the web server software you're using.
For Apache:
Edit the Apache Configuration File: Locate and open your Apache configuration file, typically found at /etc/httpd/conf/httpd.conf or /etc/apache2/sites-available/000-default.conf.
Add a Virtual Host Entry: Insert the following configuration:
ServerAlias: The *.yourdomain.com directive tells Apache to respond to all subdomains.
DocumentRoot: Ensure this points to the directory where your website's files are stored.
Restart Apache: Apply the changes by restarting Apache:
bash
sudo systemctl restart apache2
For Nginx:
Edit the Nginx Configuration File: Open your Nginx configuration file, usually located at /etc/nginx/nginx.conf or within the /etc/nginx/sites-available/ directory.
Add a Server Block: Include the following configuration:
nginx
server {
    listen 80;
    server_name *.yourdomain.com;
    root /var/www/html;
}
server_name: The *.yourdomain.com directive tells Nginx to handle requests for all subdomains.
root: Ensure this points to your website's root directory.
Restart Nginx: Apply the changes by restarting Nginx:
bash
sudo systemctl restart nginx
3. Verify the Setup:
Test Subdomains: Open a web browser and navigate to various subdomains (e.g., test.yourdomain.com, demo.yourdomain.com). They should all direct to your server's content as configured.
DNS Propagation: Remember that DNS changes can take up to 24-48 hours to propagate fully. If a subdomain doesn't resolve immediately, give it some time and verify your DNS settings.
Additional Considerations:
SSL Certificates: If you plan to serve your site over HTTPS, consider obtaining a wildcard SSL certificate to cover all subdomains.
Application Logic: Ensure your application can handle requests to various subdomains appropriately, especially if different subdomains should serve different content.
By following these steps, your server will be configured to handle wildcard subdomains effectively.
21. Manage Custom Fields
All demo custom fields are pre inserted on theme activation.
If you want to change it here is a custom fields management tool.
We integrate a custom fields management app in which you can easily create, drag-drop, edit, delete language translate on one page.
You can set single custom fields for multi categories or assign to all categories.
Go to Admin panel > custom fields
As you can see in following screenshot.
22. How to provide rating on Envato Marketplaces items
Follow these steps.
Go to your Downloads page.
Find an item that you’d like to rate in the list of items you have purchased.
Rate it! The item will be available for rating only after you have downloaded it. There will be an option to provide a star rating below the download button.
Once you got the site_key, you can add it in Admin panel > Settings > Google reCAPTCHA > reCaptcha key. and add reCAPTCHA Public Key and reCAPTCHA Private Key:.
25. Security Header Not Valid When Setting up Paypal
Paypal security header is not valid error message can be shown because of the following reasons:
You have set up live credentials and you have turned Test mode to ON. If you want to test you need to set TEST credentials and have Paypal Sandbox Account
You have white spaces in your credentials. Eq. api_username_123gjh123g – You see how much whitespaces after the Eq.
You put wrong API credential in wrong place ex. API Signature data you put in the API Username field inside QUICKAD or QUICKJOB or QUICKVCARD or QUICKQR or QUICKHOMES CMS Paypal fields.
26. How to Upgrade Quicklancer
Step 1:- Go to Cpanel Filemanager public_html/admin/uploads
Step 2:- Upload there QUICKLANCER-CMS-VERSION.zip file (manually upload the zip file in admin/uploads folder via FTP or Cpanel.)
Step 3:- After uploading completed you can see install button in your website admin/update.php
Step 4:- Click on install button and wait for complete
Step 5:- Done.
Note:- If the process does not work then it means the post_max_size value is very low in your server php.ini file. So edit below values in php.ini file or contact to your service provider.
memory_limit = 512M
post_max_size = 512M
upload_max_filesize = 512M
Zip Php Extension required for upgrade
Thanks
27. How to create new membership package or plan?
For Package : Admin Panel > Membership > Package and click Add package
For Plan : Admin Panel > Membership > Plan and click Add plan
Facebook app is used in many cases, the most used case is Facebook login integration on the website. In this tutorial, we’ll provide the step-by-step guide to creating a new Facebook application. To implement login with Facebook on the website, you need to register an app in Facebook developers panel.You’ll get App ID and App Secret from the Facebook app, these details are required for authenticating your web application with Facebook.
Facebook Apps Creation
To create the Facebook app, App ID, and App Secret, follow the below steps.
Select a platform to get started. If this app would be used with the web application then select Website.
Choose an existing app or type the name of your new app (MyWebLoginApp).
Enter the Contact Email and select app Category. Click on Create App ID.
Skip the quick start process by clicking on Skip Quick Start link.
You would be redirected to the Apps Dashboard.
Click on Settings from the left side navigation menu panel.
Enter the App Domains (If you want to test Facebook login at the localhost server, then your App Domains should be localhost).
Click on Add Platform button and select Website as a platform.
Now enter your website URL (http://localhost/facebook-login/) and Save Changes.
Click on App Review link from left side navigation menu panel. Make your app live and available it for public.
Click on Products > Facebook Login link from left side navigation menu panel. Now enter Valid OAuth redirect URIs (http://yourdomain.com/) and Deauthorize Callback URL (https://yourdomain.com/includes/social_login/facebook/index.php) and Save Changes.
Congratulation! your apps creation has completed.
Back to the Apps Dashboard, you’ll see the App ID and App Secret.
Setup for Quickad Classified
App ID and App Secret are needed for using the Facebook APIs. Check the following tutorials where we’ve used the App ID and App Secret for accessing Facebook Login API. Copy and paste in Admin > Setting > Site setting
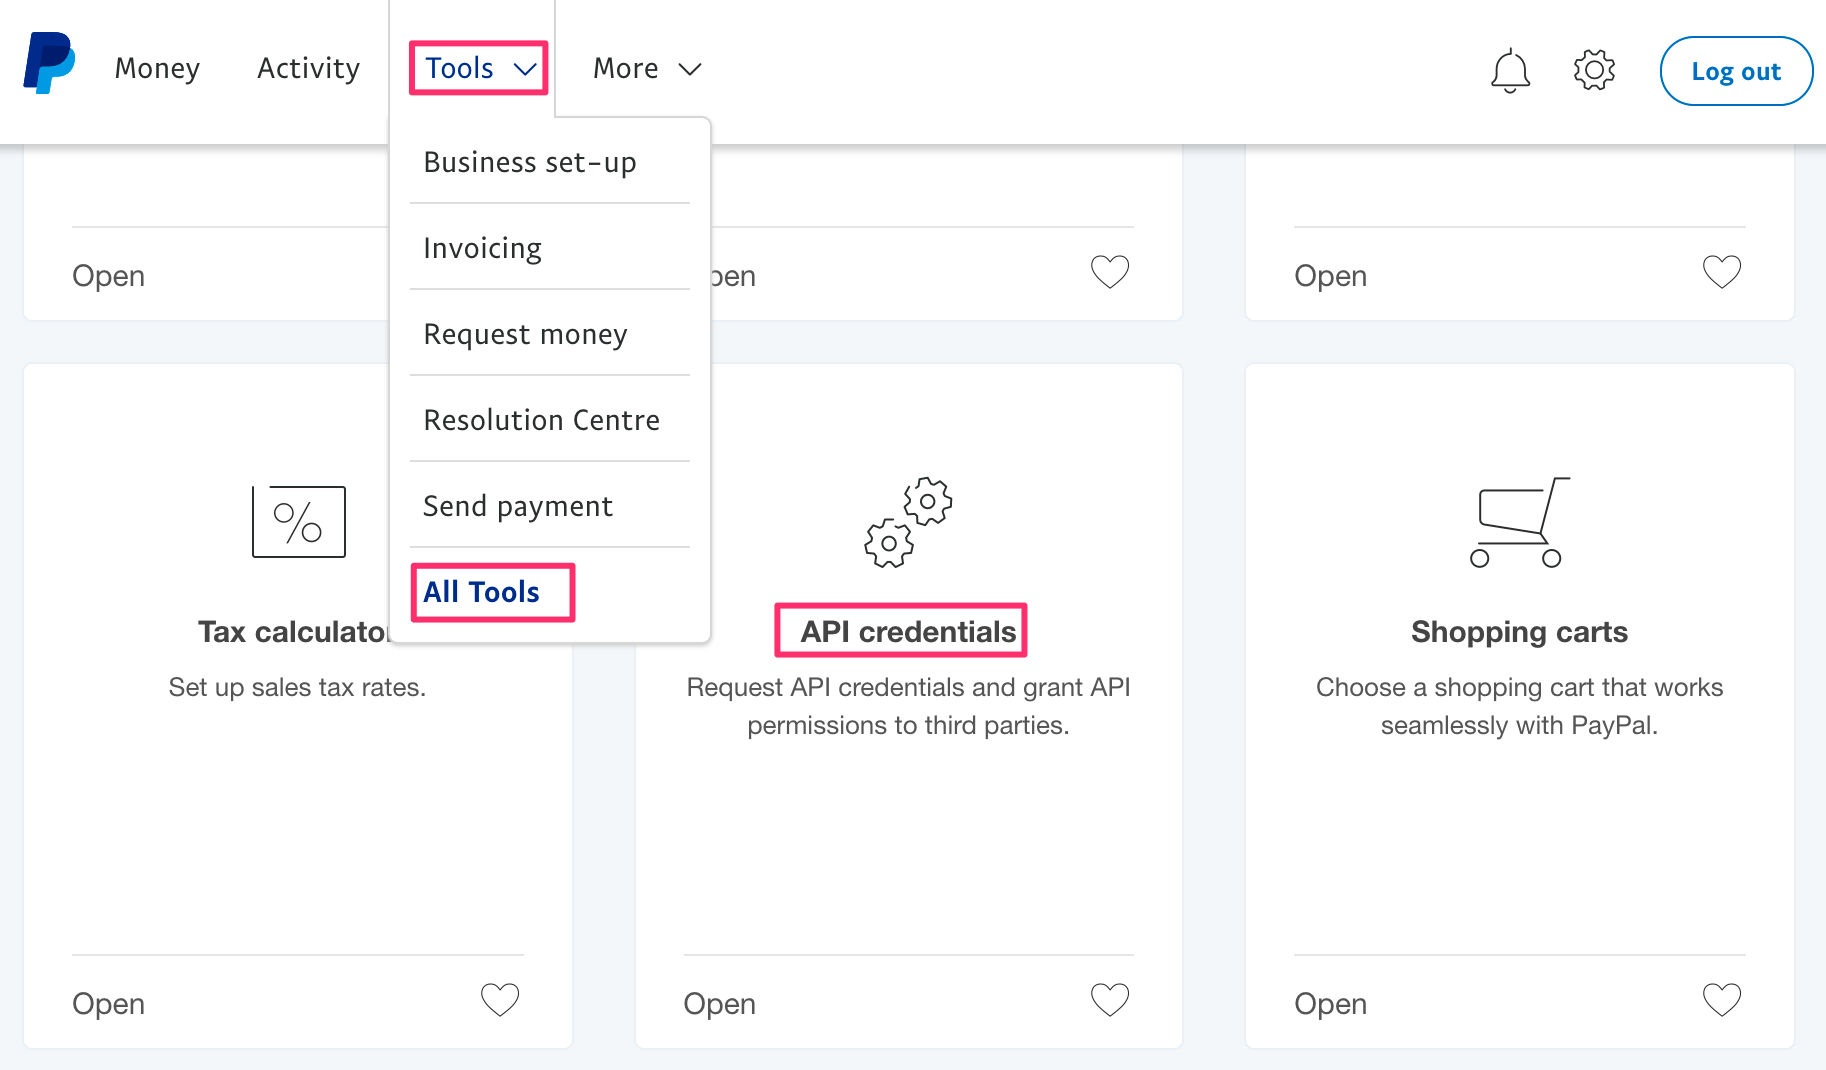
Once on the API credentials page, click on the last option for NVP/SOAP API integration.
Last option – NVP / SOAP API access
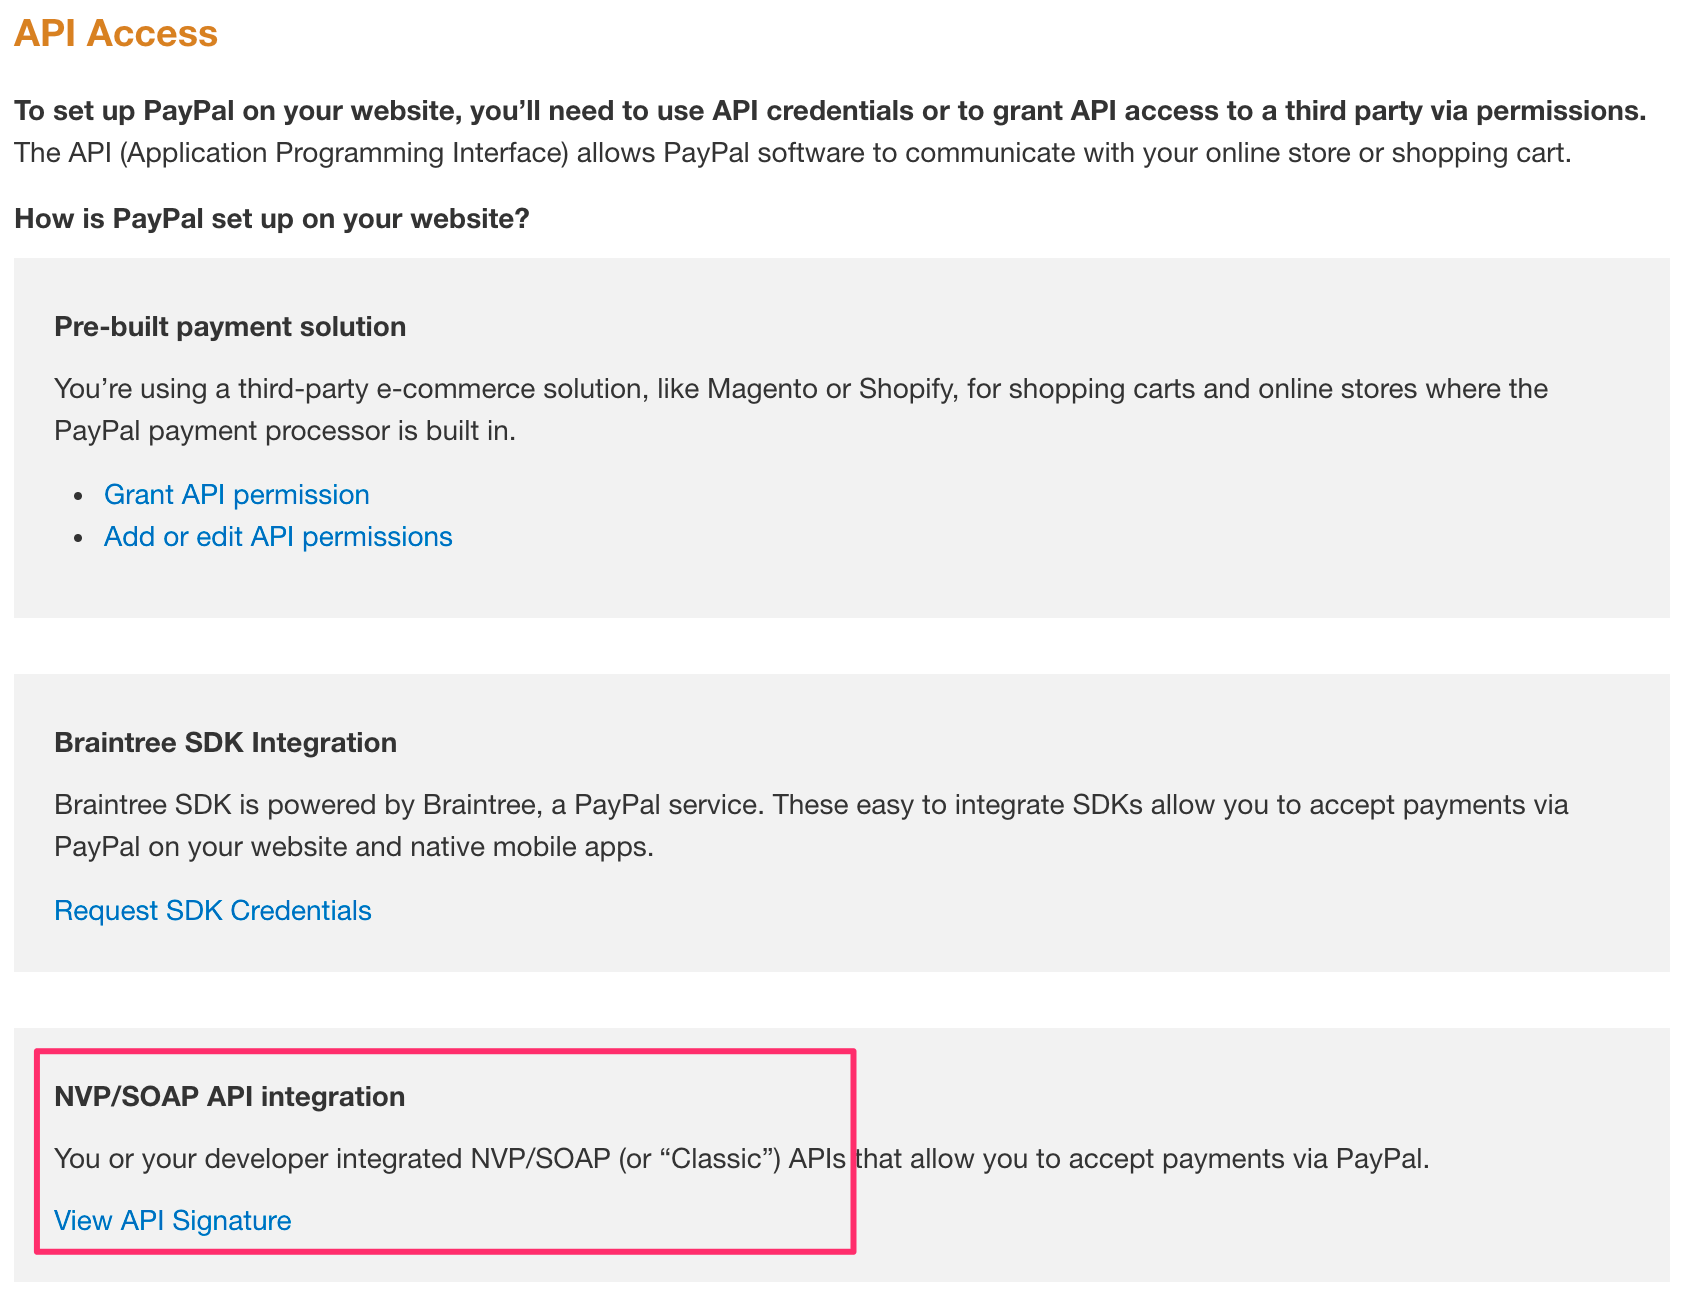
If this is the first time you are creating API credentials, complete the API Credential Request form.
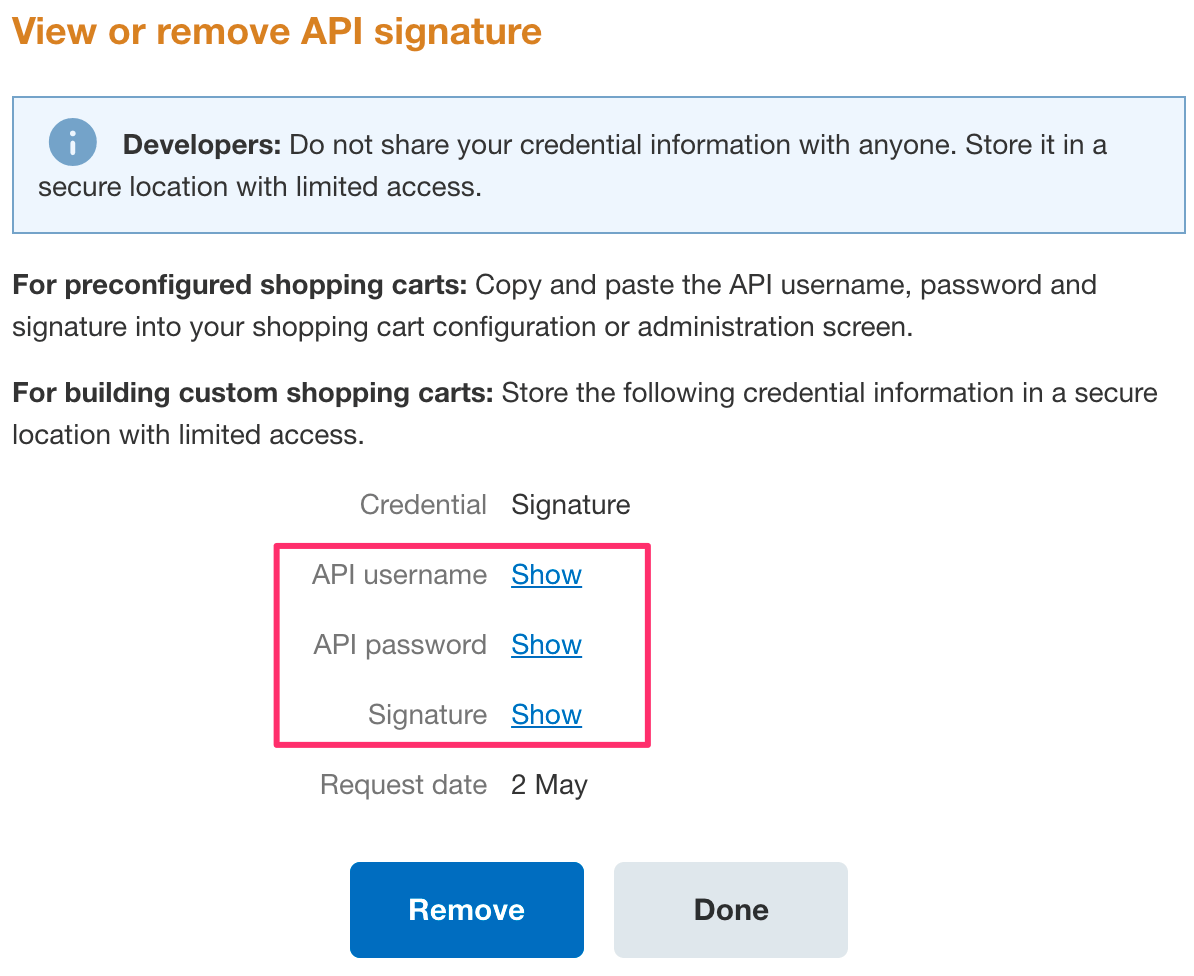
Once you’ve created the API credentials, you will see View API Signature option under NVP / SOAP API integration. Clicking on that will bring you to a page like the following screenshot. Click on each “Show” link to see API username, password and signature.
View or Remove API signature
Remember, API credentials are sensitive information. Store them securely and never share them with unauthorized people. In case you suspect a compromise, immediately remove API signature and create a new one – following the steps above.